Pages

Saturday, November 30, 2013

Onward & Upward......Skybound.....by Tonya

Hello Moonbeams!
 
Tonya here with an inspirational creation.
 
Our current Get Inky Challenge is Onward & Upward....Skybound! 
 
What is more perfect than a rainbow?


For more details on my creation, head over to my blog.
 
To link up your creation for the Get Inky challenge, click here


Friday, November 29, 2013

Onward and Upward Challenge Inspiration- Sue B

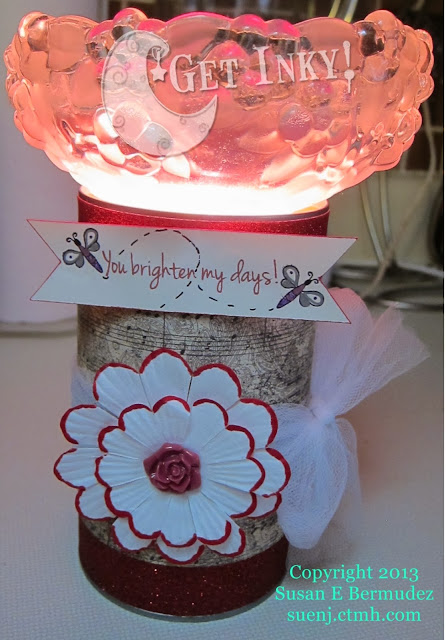
Good day all! It is my turn to bring inspiration for the Get Inky Stamps Challenge "Onward and Upward." I have to say that this was a team project with my dear Hubby. He loves tart candles as they make our house smell delicious. I always say that he is my MacGyver. He decided  he wanted to make his own tart warmer for our main bathroom. He, of course, needed my help to make it pretty! To me onward and upward makes me thinking of the flying creatures of the world. Here is the finished product:


Supplies Used:

SU Paper Flowers
SU Rose Embellishment
SU Red Glitter paper
White Tulle ribbon

Thanks to Get Inky! Stamps for having me over. Until next time...

Wednesday, November 27, 2013

Julie's Onward & Upward Inspiration for Challenge #18

Is it still hump day when the work week is so short? Happy Wednesday, my friends.  Julie here today from Muddy Paws & Inky Fingers. There's a new challenge underway over on the Get Inky! Challenge blog, and the theme is Onward & Upward.
I made a hot air balloon card using my Silhouette earlier this summer, and I thought the shape would be perfect for this challenge.  So, I looked through my computer folders until I found it, and made another balloon shaped card for this challenge. 
 
 
The stamp set I used on this card is the Get Inky! Stamps Love Bugs set.
 

Come join the Onward & Upward Challenge at the Get Inky Challenge blog.  I'd love to see what you create with this theme!
To learn more details about this card, and to see what else I've been working on, please visit my blog.
And Happy Thanksgiving to my American friends!

Friday, November 22, 2013

"Thanks" Pumpkin Double gate fold


Hello, it's Ann here from the Get Inky! Design Team with the card I made for the "Thanks" challenge.  It is a double gate with overlapping front panel flap card.  I used the adorable pumpkin stamp from the Holidays 2013 stamp set which I stamped with Memento Black ink, coloured with orange gelatos by Faber Castell and some Prisma coloring pencils. For the card base I used some orange card stock from my stash (Staples) and some scraps of printed paper.  The white card is from Stamping' Up!, and the trim is cord from Dollarama.  In order to make the front panel I die cut the white and a piece of orange card with a Stampin' Up! Sizzix die.  The white and orange were cut at the same size initially and then I trimmed along the edges of the white card before I matted it on to the orange piece.

That's it for now.  I hope that you enjoyed this quick project and perhaps are inspired to show your "Thanks" to someone during this holiday season.  Thank you for stopping by.  I f you would like to see more of my own projects., come over to my blog, Annmakes, and see what I am up to.

Thursday, November 21, 2013

Twisted Thank you Card Gift Holder

Good day all!

Today is my turn to bring it for the Guest Designer Post over at the Get Inky! Stamps Challenge. Thanks is the theme and I went crazy. I made 3 variations of the Twisted Gift Card Holder that Scrapbooking Blessings Club Blog. Here is the trio of cards that I made:


Here are the insides of these cards:


Joyful Jar Drinks stamp set

Sew Sweet Cupcakes stamp set

Sew Sweet Cupcakes stamp set
I plan on teaching this as a workshop as well as it took no time at all to make these. The supplies I used are:

* Get Inky! Stamps Sew Sweet Cupcakes and Joyful Jar Drinks
* Laughing Lola Workshop on the Go
* Frames, Tags & Border stamp set from the EXCLUSIVE Close to My Heart Cricut Art Philosophy Collection
* Tombow Adhesive

Thanks to Get Inky! Stamps for having me share these fun new cards. Please stop by their Etsy shop as well. Stay tuned for some holiday cards that are coming up as well. Until next time.....

Tuesday, November 19, 2013

Thankful - CAS Style

Happy Wednesday!
 
I wanted to share with you a CAS card I created using Blue Moon Creations' Buzzing Bees Stamp Set.
 
 
I used sequins and paper trim from Doodlebug, and stamped "Thankful for You" from the stamp set in Wild Honey distress ink. 
 
Get Inky's current challenge is still live.  Head over the blog and enter your creation.   


Sunday, November 17, 2013

Get, Inky! Challenge- Jessi DT


Who else is in getting their plans ironed out for Thanksgiving next week? EEEkkk! It's next week! So it is only fitting that the current Get, Inky! Challenge is "Thanks & Thanksgiving"! Hop on over HERE to see the challenge rules and details!

Here is my creation using Get, Inky! Stamps Halloween:


Aren't those perfect pumpkins to practice your coloring skills?

We cannot wait to see you festive creations! Don't forget to link them up to the current challenge!

Jessi - DT

Friday, November 15, 2013

Snowmany Thanks!


Happy Friday, crafty friends! Julie here today from Muddy Paws & Inky Fingers.  The current theme for the Get Inky! Stamps challenge blog is "Thanks & Thanksgiving". With that in mind, I created this gift card holder: 
 
 I cut the gift card holder out on my Silhouette, and used the Get Inky! Stamps Holiday 2013 stamp set to stamp the sentiment. You can find it in the Etsy shop
Here's the inside view:
 
 
I think this will be the perfect holiday gift for the teachers, staff members, Sunday school teachers, beauticians, and Postal workers in my life.  That's all for me, I've got more gift cards to make and stamp!
Create your own "Thanks and Thanksgiving" project and join the challenge! I'd love to see what you make!
For more details about this project, and to see what else I've been working on, please visit my blog.


Wednesday, November 13, 2013

Inspiration from La-Vie for Challenge 17: Thanks


Have you heard about the challenge at the Get Inky! Challenge blog? It's all about giving thanks. To inspire you to join in on the challenge, I created a Thank you card using two Get Inky! Stamp sets - Sew Sweet Cupcakes and Love Bugs (found on Etsy).


Thanks for stopping by! For more information and a supply list please visit my blog. I hope to see your entry in the challenge!

La-Vie

Tuesday, November 12, 2013

Challenge 17: Thanks - Lyne's Inspiration


     Lyne here with another challenge inspiration.  The current challenge topic is thanks.  
     I actually think this is my favorite project I have done for Get Inky so far! It was one of those things that came out exactly as I saw it in my head.  It was quick to make too, making it realistic if you get invited somewhere last minute.
       I used the 2013 Holiday set which can be found on the Etsy shop.  For more info on how I created the tag please head over to my blog.  
   Thank you for joining us, and we can't wait to see what you create.

Saturday, November 9, 2013

2014 Design Team Call

It's that TIME....
Design Team Call

7 Spots Available for the term Jan-March 2014

Looking for crafter's to meet these needs...

Very active on Facebook and Pinterest to post and pin as needed or as assigned (few times each week).

Have a current and active blog.

Must promote Get Inky whenever possible, and enter your Get Inky creations into at least one other challenge blog (per creation).

Available and knowledgeable to host a weekly challenge no more than 2 times during your term. (Knowledge of Linky a plus.)

Must participate in one Get Inky Blog Hop during your term.

Comment on challenge entries each week.

Pick your top 5 challenge entries on time at the close of every challenge each week.

Required to post on your blog as well as the Get Inky Stamps blog on your assigned days when projects are due.

Must be able to work with digital images.

Copic Certification a plus.

Contribute to the Seasonal Inky Moonbeams Newsletter one time per your term with How To Create A Project, a Stamping Tip, a Product Review, a Copic Coloring Tip, etc.

Willing to have fun and work hard.

Have a flexible attitude, and remember that I do too.

Complete assignments on time, or contact me as soon as possible.

During your term you will receive two stamp sets of your choice from a given selection (one 4x6 and one 6x8) as well as 12 digital images. In addition to that, I will send you one random set (if there's a new release during your term, it will be from that new release). If for some reason you can not fulfill your contracted term, please give notice ASAP to work out an agreement.

If you think you are a good fit for the Get Inky Stamp line, please apply by sending us an email no later than December 13, 2013, to getinky@att.net including:

- Your blog address
- Your Pinterest info
- 3 of your best projects
- Why you feel you are a good fit for Get Inky! Stamps
- Favorite Stamping Techniques
- Any other design teams you are currently on
-Previous design team experience

We look forward to hearing from you! If you don't try, you'll never know.


Thursday, November 7, 2013

Lyne's 3-D Holiday Inspiration: Challenge 16


 Hi everyone...Lyne here with today's challenge inspiration.  The current challenge was doing a holiday project, but it had to be 3-D.  The front is three popped up layers.  The inside is then a pop up, and the gingerbread man pop off of the pop up.
     I used the gingerbread men, and Noel, from the 2013 Holiday set which can be found on the Etsy shop.  For more info on how I created the card please head over to my blog.  Hope you decide to join us, and we can't wait to see what you create.

Monday, November 4, 2013

BOO! - Get Inky! Challenge #16

Happy Monday, to all crafty friends and family !!! 

Kathy, here and I am here today with some inspiration for you for the current challenge on  Get Inky! Challenge blog  . . 3D Holiday.  

As I mentioned on my last Guest Designer post, I just LOVE Get Inky! stamps . . . so much that alI needed was the "Halloween Spooktacular 2013" stamp set which was on its way to me. Well, it made it and I couldn't be more happy with it.  As soon as I got it, I went to work on some really cute "You've been BOOed" treat basket . . . kinda like May Day baskets, but more for Halloween (or anytime of the year you want to "BOO" someone).

Yes, I know that Halloween is over . . . BUT I had to share what I did ---

(This is my "You've been BOOed" all together)

 (This is "You've been BOOed" the "instruction" sheet on the outside)

(and this is a close-up of just the instructions)

NOTE: It does say make a copy of the BOO sign . . . well, instead of doing a big BOO sign, I did a tag and added little BOOs to my treat holder. :)

So what do you think?  I know that next Halloween, I'm going to be doing a bunch more of these . . . they are so much FUN!!!

Thanks so much for stopping by . . . and remember to get your 3D projects in for Challenge 16.  (and GOOD LUCK!!!)


Sunday, November 3, 2013

3-D Holiday inspiration for Challenge 16


Hi, it's Ann from the Design Team and the blog Annmakes.  Today I have this three dimensional paper snowflake ornament to show you.  It is a fun project that requires few supplies and once you have practised making a few of these they are quite easy to make and you just might want to keep making more and more.  The snowflakes also make great gift bows and you can make them with different themed papers and stamps for different occasions.  This one was made from a Snowmen printed one sided scrapbook paper that I stamped, the reverse white side of, with the Holidays 2013 stamp set from Get Inky! and some red and green stamping ink by Stampin' Up!


I started out with a 6 inch square of paper, I stamped in vertical lines using the sayings and smaller images from the stamp set.  Once the ink was dry I cut the paper into strips one half of an inch wide by 6 inches long.  Each snowflake or bow requires 12 strips.  The process involves the weaving of six strips of paper connected to another six pieces of paper woven together.  I got the idea to make these snowflakes from "The Frugal Crafter" and her video tutorial.  I modified the project by using the white side of the paper and the stamps.

I hope that you find this inspiring and take some time to go and GetInky!  Have fun and thanks for stopping by.