Pages

Friday, August 30, 2013

Jessi DT - Get Inky! Challenge BUGS


Hello, Get, Inky friends! It's Jessi here from Kissin' Krafts!

Have you played along with the current Get, Inky! Challenge? It's all about BUGS! So break out those critters and get your craft on!

Today's project is using a simple large bee and sentiment from Get, Inky! Stamps Buzzing Bees stamp set:


The bee image is colored in and cut out. The cut out is attached using a foam dot to make it POP off the card. The twine is added to showcase the bee's trail.

Thank you for stopping by today! We hope that you stop by the Get, Inky! Challenge and join in the fun!

Would you like to hear the latest Get, Inky news? Join us on Facebook for the latest updates!

Thursday, August 29, 2013

Thrifty Thursday Tip

Hey there inky friends! Have you heard the news about Blue Moon Creation?They are expanding their business and opening up the BMC Crafting Station! It's where you can purchase superior paper crafting materials to help you get your craft on! First product to arrive is Dew Drops from The Robin's Nest. Prices range from $4.25 to $5.50. And...if you buy one of each in stock, you will save even more! To place an order visit the website.

Now for today's thrifty tip...
Re-ink those ink pads! Sure it will take a bit more effort, but it is the best way to cut costs in the long run! Now...to practice what I preach....

Time to go...


Wednesday, August 28, 2013

Whatcha' Workin' on Wednesday with Julie

Hi again, Get Inky! friends.  Julie here from Muddy Paws and Inky Fingers again today. Yesterday I had a stamping tip for you.  Today, I have a little sneak of something I'm working on for a Get Inky! Stamps project.
Here it is:
 
Can you guess what I'm working on?  I'm using my score board to get nice crisp folds and creases (today's tip for you, and it's not even Tuesday!).  I promise you, this does involve stamping, but I'm going to make you wait until Sept. 5 to see the finished piece.  We'll see if anyone figures out what it is before then.  You can tell me your guesses on our Get Inky! Facebook page, here on this blog, or on my blog.  Good luck!

Lunchbox Love Note for Challenge 11: Bugs


Cheers Get Inky! Fans!!

It's DT member La-Vie with a back-to-school project to inspire you to enter our latest challenge Bugs! I've created a fun lunchbox love note for my 8 year old daughter using 3 stamps from the Love Bugs stamp set available on Etsy.

For more views and information on this love note please visit my blog.  Until next time... have fun and Get Inky!

La-Vie

Tuesday, August 27, 2013

Tuesday's Terrific Tips and Tricks

 
Happy Tuesday, Get Inky! Stamps friends. Julie here from Muddy Paws & Inky Fingers. I hope you had a chance to get your ink on this past weekend!  I have a very simple, yet effective stamping technique to share with you today.
 
Here's what I do every single time I'm going to stamp an image:
When I get a package in the mail, and it comes with thin foam for protective wrap, I save that foam.  It makes an excellent cushion for stamping. Then, before I stamp, I place a piece of that foam under the paper, where I'm going to stamp.
 
 
See that thin piece of foam? and the tag I'm going to stamp onto?  The foam is my secret to success.  I'll show you:
Here's the sentiment I'm stamping, without foam.  You'll notice it's a bit "blurred".
 
 
Now, here's the same image, using the same ink, stamped exactly the same, except I stamped on foam.
 
 
Can you see the difference?  Look closely by the 'H' in hope and 's' in sweet and you'll see what I mean.
That's your Tuesday's tip for today.  I hope it helps someone with their stamping technique. Get inky!


Sunday, August 25, 2013

DT Member Beth ~ Challenge # 11 Bugs

Hi, Beth here from The Crafty Scrap Yard!

Today's card is inspired for our "Bugs Challenge!  
For this challenge I decided to stamp one of the butterfly stamps from the Love Bugs stamp set, It is one of my favorite sets!

I planned on making a card, but as I began putting papers together I decided the butterfly went best on this particular sheet; and it would be best as a layout.  I desperately need to do layouts, so it was perfect!  =)


More details about my card can be found on my blog here.

For my card I used the Love Bugs stamp set for the greeting; you can both find here.  You can find out about our current challenge posted on our Get Inky! Challenge Blog.  


I hope you stop back soon again to visit soon. ♥♥(ˆ◡ˆ)♥


~Beth DT

Saturday, August 24, 2013

BUZZ BUZZ!!!

Good morning it Tracey here today!!

This is my project for today, has the challenge this time is BUGS I have made this bee stepper card!!


So I made the stepper card & distressed the edges with a yellow & orange ink. For the sentiment I have used the Mini Buzzing Bees 4x4" the hairy bee are from the Buzzing Bees 8x12".


I have just cut them out & colour with copic pens & to finish just added some yellow flowers with a
punch.
Thanks for looking & please join our challenge. 


Whimsical Moon and Stars 4x6"


Thursday, August 22, 2013

Fun & Spooky Boo Treat

Happy Thursday! I hope you all are having a great week. :) Ashley here today to share with you a project I made for the current bug challenge happening over at the Get Inky challenge blog! I'm having a hard time believing September is almost here, and can hardly believe Halloween is just around the corner! For my bug project, I decided to make a Halloween treat bag using the new Halloween stamp set:


I stamped the sentiment using Memento Ink in Tuxedo Black, and used a white gel pen to color in the eyes in the word 'Boo' just to be silly. :) I also added some White Opal Liquid Pearls to the corners of the treat topper to bring out the white of the eyes. The bag is filled with Star Burst candy. :) 


And here's a look at the set, which can be purchased in our Etsy shop!


Have you started working on your Halloween projects yet? :) 
Ashley


Wednesday, August 21, 2013

Whatcha Workin On Wednesday with Ann


Hi Get Inky! Inkers!  It's Wednesday and I get to show and tell what I have been working on.  My youngest son's birthday is coming up and since I usually make all my cards this year was no exception. Well, except for one exception, that I now have some fabulous sentiment stamps that are perfect for the males in my household!  Actually these are great for gals too that are techie oriented.  Thanks to Thia from Blue Moon Creation who designed these cool stamps.  Check this out:


I am only giving you a peek at the card in progress because I have yet to give it to my son.  See the stamp set there on the left?  Well that is "Geeky Fun" 6" x 8" from Get Inky Stamps for Blue Moon Creation. There are 21 (twenty one) sentiments and 11 icons or images.  Yup!  What a great set and what a deal!

I used the sentiment "Error 404" with Ranger's black Archival Dye ink and "Card Not Found" with Ranger's Distress Ink in Barn Door Red.  I also used the "Happy Birthday" sentiment and the black ink in the inside part of the card.

The paper I used is from the fabulous "The Generation Tech Stack" from DCWV, I bought this a few years back.

This is going to be a gift card holding greeting card:


Well that's all I am showing you!
Hope you are inspired to make some cards of your own.
Thanks for stopping by.

Tuesday, August 20, 2013

Tuesdays Terrific Tips and Tricks

Hey there crafty friends...sorry this is a bit late in the day, but here we are with today's tip.
Get Inky has a lot of small stamps, which helps make the sets more versatile.
Have you ever found that you don't have
just the right size of block for the size of stamp you wish to use.
To make sure you get a crisp stamped image every time, try this:
Position the stamp you plan on using onto one side of the block and then
balance the block by putting another stamp on the opposite side of the one you are using!

Cool idea? Yup, we thought so too!!!
Now go on and...

Monday, August 19, 2013

Mondays Mojo Mention

Good morning Monday and our inky pals! Here's your mojo for the day, thanks to our Super Inky! Winner, Angeline C. Here is her card from our last challenge...we love her creative ribbon! 

Adorable card! Your turn now! Go get inky and enter our next challenge. This challenge is BUGS. We can't wait to see what you create. And who knows, maybe your entry will be featured on our Facebook Fan Page or right here, as our Mondays Mojo Mention! You'll never know unless you try! Thanks for stopping by!


Sunday, August 18, 2013

Sundays Sketch

As we promised a new line up for our stamps blog, we are ready to deliver. Here is how it will work...

Every day there will be some sort of post here on our blog... it will either be our daily special or an inspirational card made by one of our talented design team members, based on our current challenge. So be sure to check back each day, so you don't miss any of the great content we have for you. Lots of great tips are in our line up, so you won't want to miss it!

Since we are between challenges right now, today we bring you a sketch. Maybe you'll decide to use it in our next challenge that starts tomorrow? Enjoy!


Friday, August 16, 2013

Spooky.......... Ribbons

Happy Friday!
 
 
Tonya here with my creation using Get Inky! stamps by Blue Moon Creation
 
I LOVE the new holiday stamp sets. 
 
 
For this little card, I used the Spooktacular Halloween Set.  
 
I started with a black cardstock base (4.25' x 5.5').  The haunted house background print is from a 4.5 x 6.5 DCWV mat stack.  I tied a small bow of 3 Girl Jam's Hot Chocolate for a touch of fun.
I used the new shaded lilac distress marker by Ranger to color the candi dots (top left).  After coloring, I stickled them. 
 
The cute monster was stamped and painted with Stickles, to match the candi.


The word 'spooky' is also from this stamp set.   I stamped it in Memento tuxedo black ink and went over it with a Spica pen to add some sparkle. 


Get Inky's ribbon challenge is going on through tomorrow.  Head on over and link up your crafty creations. 


Thursday, August 15, 2013

More Ribbons

Tracey's day so this is my card for the ribbon challenge !!!


So I have used the new Christmas stamp plate for my card. Stamped & embossed with gold embossing powder. The layers I have used were gold mirror board & a dark red paper which I have cut with a spellbinder. Then I ribbon I have used is a gorjuss red satin ribbon which I have made in to a chocolate box bow. Add some flowers to finish.

Thanks for looking & please join us this time .

TRACEY XX

Wednesday, August 14, 2013

Whatcha Workin On Wednesdays and Our SPOOKTACULAR Winners!!!

And what you have all been waiting for...drum roll please...
WINNERS from our SPOOKTACULAR blog hop!!!
Here are our three winners for the $15 gift to our Etsy shop:
(Please use the Request Info button on our website to claim your prize HERE)
How KI-UTE is that?? I love this fun little idea, especially the anonymous part! I see many giggles watching my co-workers try to figure out where it came from. What a fabulous stamp set! Such wonderful images and the font is just perfect for Halloween! So glad to find something new and different for "happies". Thanks for sharing! 

What a fabulous layout! Love it!
~Emily

Great cards! Love the bats in the jar!
Pam
scrap-n-sewgranny.blogspot.com

And our GRAND PRIZE WINNER IS:
(*winner pays shipping charges via PayPal emailed invoice.)

Kathy Gayhart Carter

2 days ago  -  Shared publicly
Hey Ann... Love the cards and the use of the stickles. I am just starting to work with them and I am having so much fun :) Thanks for the inspiration and for sharing your great project. A New Follower ~~ Blessings,

Kathy Carter
carterscraftingcorner.blogspot
https://www.facebook.com/CartersCraftingCorner?ref=hl
(Please use the Request Info button on our website to claim your prize HERE)

Congrats to the WINNERS and THANK YOU to all who hopped along with us!

If you missed the hop, you missed out on some fun treats and wonderful projects from the design team.
When you have some free time, you can always go back and check it out.
Now for today's post...
Whatcha Workin On? Wednesdays
Thia here and today I have a sneak peek of what I am currently working on...
Yes, you are getting a peek at my computer screen displaying the current stamp set in creation.
Actually, by the time I get finished with it, it will be 3 sets of stamps.


Wanna see more?


And if you haven't figured out the theme of these sets, maybe this might help...


Each of the sets will be combo sets containing stuff for both male and female scouts or jr rangers.

I hope you enjoyed today's sneak peek at what the future holds for GI fans!

Thanks for stopping by!
Now go and...


Tuesday, August 13, 2013

Some Serious Inspiration for Challenge 10: Ribbons


I got ALL in the Christmas spirit to inspire you to enter the Get Inky! Challenge 10: Ribbons. Using the 2013 Holiday set I decorated a clear acrylic gift tag that can double as an ornament!! This amazing set is available at the new Etsy store.

For detailed info on this project and a supply list, visit my blog by clicking here. I look forward to seeing your creations in the challenge! Thanks for stopping by!


La-Vie

Monday, August 12, 2013

Mondays Mojo Mention

Today we are featuring an entry from our current challenge, RIBBONS by ScrappyScrappy aka Angeline C. Such a beautiful card! We love the colors, the layout, and the huge ribbon, as well as that yummy looking cupcake with the cute little ants! Thanks Angeline for giving us some mojo for our Monday!

To view more of Angeline's creations, please visit her blog at: ScrappyScrappy

Thanks for joining us today!
Don't forget to check back on Wednesday to see if you are one of our Blog Hop WINNERS!!!

Now go...

Friday, August 9, 2013

GI 2013 Halloween Spooktacular Blog Hop Final Stop!!!

Hello spooky hoppers!
This is your LAST STOP on the hop!
We hope you had a SPOOKTACULAR time hopping along with us!

You should be arriving here from the talented Tracey. If so, great!
If not, please start at Thia's Blog where you will find the complete line up.

We sure do love reading all of your comments so please leave one or two...cuz if you do, we have a treat just for you!!! Once you comment on this final post, visit our website HERE. Look over our digital images, pick one you like, remember it's name, then click on the contact us button. Fill out the form, including the name of the digi you like. You will be emailed that digi in 2 weeks, if not sooner.

Don't forget the 20% off sale at our Etsy shop ends soon (11:59PM PST August 11th).
 Use coupon code 2013SPOOKTACULAR20 when you are checking out.

Winners from the hop will be announced here on Wednesday, so be sure to check back with us.
You'll have one month to claim your prize.

How do you win, you ask? Pretty simple...
To be eligible for any of the prizes, you must...
-Follow ALL blogs along hop, if not doing so already.

For grand prize (which is this newly released 2013 Halloween Spooktacular Stamp Set): 
- Leave a comment on EVERY blog post (as well as above task of following all blogs along hop).

For a chance at $15 to our Etsy shop:
-Leave at least one comment on any blog along the hop
(as well as follow ALL blogs along hop, if not doing so already).

So...Are you ready to see this fun set that was used for all those wonderful projects? 
Are you ready to Get Inky for Halloween?


This set is in stock and ready to ship NOW!
Just in time to help you start creating all of your Halloween projects!
Get it HERE!

Thanks for hopping with us. If you had fun, please refer a friend to this hop! Thanks soooo much!

Now go...Get Inky!

and the Get Inky Design Team!


Thursday, August 8, 2013

Nifty Thrifty Thursdays Tip

Hey there inky fans! We have a Nifty Thrifty Thursday Tip for ya, that is just perfect for our current challenge, RIBBONS...let's get inky, k?

With this, there's no need to go out and buy that matching colored ribbon for your project, because...you can make your own, out of white or sheer light colored ribbon and Copics! 

When I attended the Standard Certification Copic Class, this topic was brought up, but it was something I had discovered on my own months earlier.

In the class, it was suggested to put your ribbon in a Ziplock bag and add a few drops of color from your Copic refill bottles. No refill bottles? Not a problem! I actually like coloring with my Copics directly on my ribbon. 

Have you tried this yet? If so, we'd love to see! If not, why? Why not jump in and give it a try? If you decide to, please share your experience with us...we love seeing our fans Get Inky!!!

Don't forget, when the clock strikes midnight tonight we will be hopping!!! The SPOOKTACULAR event starts over at my blog HERE. You have all weekend to hop with us, so enjoy hopping (no need to feel rushed). See you at the party!


Get Inky! Stamps ~ Ribbons by SueB

Hidey ho all!

Today I get to be show you a WONDERFUL stamp set that I used to make my Ribbon card for Get Inky! Stamps (by Blue Moon Creations). I used the Beary Special Cupcake stamp set and bought the paper just for it! I can tell you that I really enjoy working with these stamps set as they are so versatile. Here is my card, let's call her Teresa the Teddy Bear:


The reason I call her Teresa is that she has a pretty tulle ribbon bow. Here are the supplies I used:

* Recollections Sweet Treats 12 x 12 paper
* Scrap Paper: Blue and Pearl White
* Memento Black Archival Ink
* Get Inky! Stamps Beary Special Cupcake stamp set (bear w/cupcake and sentiment)
* Versamark stamp pad
* White Tulle
* Stampin' Up brads

I cannot wait to use this stamp set more and more. Thanks for stopping by and I look forward to our Get Inky's Spooktacular Blog Hop this weekend (August 9-11). 

See you then. Until next time...

Wednesday, August 7, 2013

"What'cha Workin' on Wednesday"

Hello, Get Inky! friends, Julie here from Muddy Paws & Inky Fingers with a new feature to share with you!  Each Wednesday, someone from the design team will give you a sneak peek into something we're working on. 
I'm on vacation this week, and I spent some time on a rainy Monday morning working on an upcoming Get Inky! Stamps project.  Here it is!
 
 
Can you tell what I'm working on?  I'm using Perfect Pearls, Get Inky Stamps (of course), and Close To My Heart Outdoor Denim cardstock. That's all I'm going to show you! You'll have to wait until the new challenge begins on August 19th for the rest of the project!

Ribbon here, Ribbon there!

Hello, friends, Julie here from Muddy Paws & Inky Fingers with some ribbon inspiration for you this hump day (that would be Wednesday, if you're not a camel, LOL). I love that commercial, BTW!  I laugh every time I see it. "Mike, Mike, what day is it?".  OK, enough of that! Back to the ribbon theme! Have you checked out the current challenge on the Get Inky! Challenge blog? Well, if you haven't, you've probably guessed, the theme is ribbon!
Here's a card I made with a ribbon theme:
 
 
I used the Get Inky! Stamps "Sew Sweet Cupcake" set to make this card, including the fantastic sentiment. The cupcake and stamped ribbon were colored with Copic markers.  Please visit my blog for more details on how I made this cheery birthday card, with ribbon here and ribbon there!
Then, use some ribbon, a Get Inky! stamp, and enter the current ribbon challenge!
But, this post isn't done yet -- there's a new feature starting today, another post called "Whatcha Workin' On Wednesdays".  Today, it happens to be written by me.  So, you'll see a sneak peek of a project I'm making.  Look for that post here.
But wait, there's STILL more!  The entire Get Inky! Stamps design team -- the whole talented bunch is hopping, starting Friday, Aug 9.  We will be featuring the new Halloween stamp, and it is a SUPER fun one!


Tuesday, August 6, 2013

Terrific Tuesdays Tips and Tricks - Detailed vs. Regular Heat Embossing Powder


Welcome to our first Terrific Tuesdays Tips and Tricks post!

Hi. It's La-Vie and today I'm sharing tips about heat embossing and choosing the right kind of embossing powder for your projects. If you haven't heard, there's several kinds of embossing powder on the market. Today I am going to explain the difference between detailed and regular embossing powder.

I'll share tips on embossing the smallest script sentiments and the most detailed stamps. I wish someone had told me about these tips when I first started heat embossing. I went out and bought a large pack of 15 colors thinking I was "doing something." Since then, I haven't used the technique much because my results would often ruin my finished projects. I loved the thought and look of heat embossing but something was just a bit off. Well, never fear!! I've got your back. This tutorial should help make your heat embossed projects come out perfectly.

1. Supplies needed to make your heat embossing work best include:

  • Darice stamp mat (mine is cut in half) - don't stamp anything without this!!
  • Embossing buddy (or drier sheet)
  • VersaMark (or any watermark stamp pad) and VersaMarker (to correct an oops moments)
  • Get Inky! Stamps (of course) and a clear block
  • Embossing Powder
  • Heat Gun
  • Cardstock
  • NOT SHOWN - Embossing/glitter tray (shoe box top or a folded piece of copier paper to catch and return the embossing powder to its container)


2.   Before doing anything, run the embossing buddy over the cardstock several times. That will coat it with powder disallowing the embossing powder to stick anywhere but where you want it to.


3.   Ink the stamp and stamp the impression with the cardstock on top of the stamp mat. You will not be able to see the impression much since it's a watermark ink. Place the cardstock in the embossing tray and dump embossing powder on the stamped area. Some embossing powder will stick to the stamped area. Return the embossing powder that falls off back to its container and close the container.

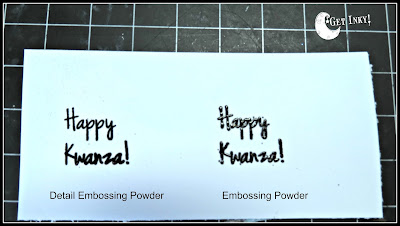
Here you can see an example of the Happy Kwanzaa stamp from the Get Inky! Stamps - 2013 Holiday Set (available at Etsy by clicking the link). It is a small skinny font. On the left is the detailed embossing powder. As you can see, you can barely see that it has embossing powder on it. it almost looks stamped because the grains are so fine. The normal embossing powder is a little more chunky and fuzzy. Furthermore, you can see areas where the powder has not stuck to stamped image.


4.  Next step is to use a heat gun to heat the embossing powder until it melts. If it looks grainy then you need to heat it more. If the paper gets brown and burnt, you've heated too long. The color will change before your eyes. It will turn from a powder to a liquid and takes a matter of seconds. You may want to use tweezers to keep my cardstock from moving around on the table. But make sure your cardstock is flat on the table during the heating process.

Here's the results! The detailed embossing powder created an even, shiny, beautifully embossed sentiment even though the font is small and skinny. The regular embossing powder created more of a spotty, messy embossing of the font. It's more shiny and more puddled.

Detailed embossing powder is made to pick up details in the stamps without puddling. Regular embossing powder is made to puddle and melt together to fill in the spaces. That's why it doesn't stick to every part of the stamped image. While detailed embossing powder works well on BOTH detailed stamps and non-detailed stamps, regular embossing powder is ONLY for larger non-detailed stamps.


Here's some more examples from the 2013 Holiday Set. The top impression is made with regular embossing powder. Notice the lines are thicker and more puddled. The bottom impression is done with detailed embossing powder. The lines are thinner - exactly as the stamp was created - and the embossing stays in place and does not puddle at all.


Here's two other views that exemplify the difference between the two embossing powders. Looks like I need to heat the middle "Ho" on the bottom some more. It's not fully melted! I love the fine lines in this stamp. It will really make wonderful Christmas crafts!


Finally, I have 2 other examples to point out using stamps from the massive Buzzing Bees set. The beautiful script comes out best with detailed embossing powder. When you compare all the loops and holes in the font they are open with the detailed embossing powder and closed with the regular. While it still can be read, it's not as neat, clean and true to form as with the detailed embossing powder.


There are may bees in this set so I chose a very hairy one to show you the difference. This one is harder to see but the hairs are thinner and more individual with the detailed embossing powder than with the regular. The eyes look clearer with the white dot being more visible as well. On the wing of the detailed embossing powdered bee, I didn't apply enough pressure so I used the VersaMarker to go in and add more watermark ink in the spot I missed. I was then able to reapply the embossing powder and heat everything together.


I suggest using detailed embossing powder for all your embossing needs. I use Ranger super fine detail and Stampendous detail embossing powders. Also check out Ranger Embossing Powder Sticky to adhere glitter, foil, flocking. I hope this helps skyrocket your creativity!!

If you have any questions, please leave it in the comments and I will do my best to answer them. If you'd like a new tutorial on the Ranger Embossing Powder Sticky, leave that in the comments as well!

Until next time... now go Get Inky!!

La-Vie