Pages

Wednesday, April 2, 2014

Whatcha Workin On Wednesday - Sue B

Greetings all!

Today I get to share my sneak peak for what I'm working on. This is the first time I get to share and I can't wait to do the reveal!! I combined two stamps sets from Blue Moon Creation Crafting Station's Get Inky! Stamps. I used the New Hoppy Spring 2014 set (BMC-0013) and a retired set (for the butterfly. Here is the little peak:
Come back to the Blue Moon Creation Crafting Station's Challenge blog on Friday the 4th to see the whole thing. Thanks for stopping by and I look forward to seeing you soon.

Happy Creating,

Sue B

Tuesday, April 1, 2014

Tuesdays Tips and Tricks - Cleaning your Copic Markers

Judy here, my turn to to share my tip for Tips and Tricks Tuesday.

I have a large investment in Copic Markers and refills probably in excess of  200 markers. Like any art tool or supply I need to maintain them.  If your neck of your pen is not kept clean your lid will not fit tight and the ink may dry up. If one of these dried flakes drop on your art work it may make smug and ruin your project. This has happened to me.

I did some research on the Internet for advice on how to look clean my markers. and tried several of the recommendations and products suggested.  I thought I would share with you what works best for me.

Most sites I visited recommended that you use Copic Cleaner to clean the body, neck and lid of the pen.  I have found using a 91% Isopropyl Alcohol, a more reasonable priced alternative to clean my markers. I purchased my  91% Isopropyl Alcohol from a drug store. If I have a small job I have use Copic Blending Solution but it is very expensive to use all the time.  I did try Nail Polish Remover and it did clean my markers  but I was worried that I would get it on my nib.

I used a Q-tip or a twisted piece of paper towel dipped in cleaner to clean inside of the cap, neck and the handle of the pen.

For a clogged nib I have soaked the nib in blending solution and have had some success fixing the problem.  It does depend  if the clogged pen is from the ink or if you have made a mistake and touched something that has caused the clog such as another medium like paint or a coated paper. I have done that more than once. Most of the time for a clogged nib I just replaced the nib.

I hope you find this information useful.

Monday, March 31, 2014

Create Stamp Twist Fold Card for your Monday Mojo!

We're excited to share with you today an entry that meets our challenge for our Monday MOJO!  Check out this circle twist fold card by Lyn T.


Lyn's cirle twist fold card is PERFECT!  We like the embossing, all the circles, folds including the cute MOOSE and Butterfly!

Thank you, Lyn for starting our week off with some GREAT Mojo!  To view more of Lyn's creations visit her blog here:http://mypurplehouse.wordpress.com/2014/03/22/i-moose-tell-you


Thank you for joining us today!

Don't forget to enter your circle designs over at our current challenge @http://getinkychallenge.blogspot.com

Saturday, March 29, 2014

" A circle is round, it has no end. For that is how long we shall be friends!"


The current Get Inky! challenge is to use circles on your project -
Get out all your circle punches and stamps!

Last week I wrote a post explaining how I made the 'flowers' pictured above -
 today I am showing how I used them!


This was my first card - I just added the embellishment to a white card blank (with rounded corners) and matted with some hand-made paper.
 I also punched a scalloped circle from this, on which to mount the sentiment.
The final touch was the lace around the edges!

My second card used the thread embellishment...


This time I mounted the 'flower' on top of a scalloped circle and decided on a circular easel card
 using yellow card.


The 'leaves' of the 'flower' are also folded circles punched from green card -
 and I punched circles from the 'word' paper (from my scraps)
for the stand.

You will find more details on my blog

Hope you will join in!!

Happy Crafting!


Friday, March 28, 2014

Friday Freebie!

Hello, it's Friday and we have a fun freebie for all our fans.   I have to share with you my inspiration for this lovely image:


The sailboat and sky were done in water colours (Staedler), the waves are strips of die cut waves and pieces of ribbons adhered onto the card base with Xyron adhesive.
Have fun with your own sailboat!
Ann, DT

Thursday, March 27, 2014

Thank You with circles

Hi, all my inky friends and family!

Yesterday for our "Whatcha Workin On Wednesday", I gave you a sneak peek of what I was working on for my project inspiration for the current challenge at BMCCS (aka Get Inky!) .  The current challenge is to use circle(s) or circle punches . . . and you still have till Wednesday to get your projects entered.

For my card I used circle punches along with faux circle stitching from "Circles of Love" stamp set by BMCCS (aka Get Inky!) along with "Sew Sweet Cupcake" stamp set and paper from The Paper Temptress.  Here's how it turned out:

Supplies:
black Momento ink
Helmar Scrap Dots 3D adhesive
1' circle punch
1-3/8" circle punch

This was so much fun to make . . . and a little challenging.  It was challenging for me to get the half and quarter circles to line up just right. :)  Honestly, it really wasn't that hard . . . just need a steady hand.  (If you want detailed instructions on making this card, please visit me at UpintheNightwithKat.)

Using the new stamp set "Circles of Love" was so much fun to use . . . and so much easier than trying to do faux stitching by hand.  So if you haven't tried out one of Get Inky!'s new faux stitching sets, you really need to do so . . . so much FUN and so much EASIER!!! 

Remember, you still have a week to get your projects entered for BMCCS (aka Get Inky!) "Circle" challenge.  I can't wait to see what everyone comes up with. :)

Until next time . . . let's GET INKY!!!

Kathy

Wednesday, March 26, 2014

Whatcha Workin' on?

Hi, all my inky friends and family!

As some of you know, I just got back from a weekend scrapbooking retreat . . . I had a GREAT time!!!  And since I had such a GREAT time, I did a "Thank You" card for the couple who runs the retreat - "Memories on Marshal" in St. Louis.  Click HERE if you would like to see it.

Well, since there is a new challenge over at 
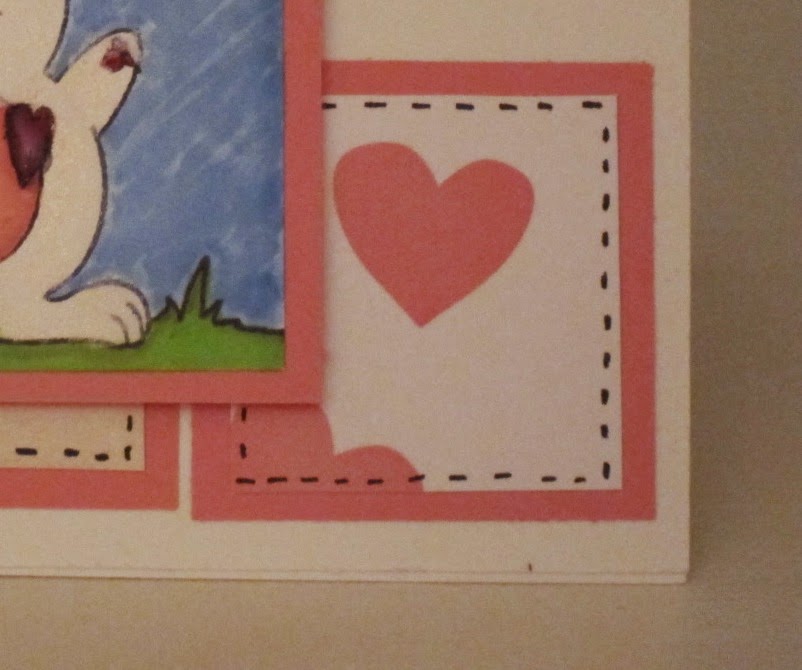
Blue Moon Creation Crafting Station (aka Get Inky!) challenge, I decided to use the same pattern, but add circles and some Get Inky! stamp on it.  Here's where I am at so far:


Make sure to stop back tomorrow to see the final product . . . and for instructions on how I did it.  You won't be disappointed . . . at least, I hope you won't be. lol

Now that you have seen what I am working on this wonderful Wednesday morning, what is everyone else working on?  Well, remember you still have a week to get your projects entered in on BMCCS (aka Get Inky!) "circle" challenge.

So let's Get Inky!!!!

Kathy