Welcome to our first Terrific Tuesdays Tips and Tricks post!
Hi. It's La-Vie and today I'm sharing tips about heat embossing and choosing the right kind of embossing powder for your projects. If you haven't heard, there's several kinds of embossing powder on the market. Today I am going to explain the difference between detailed and regular embossing powder.
I'll share tips on embossing the smallest script sentiments and the most detailed stamps. I wish someone had told me about these tips when I first started heat embossing. I went out and bought a large pack of 15 colors thinking I was "doing something." Since then, I haven't used the technique much because my results would often ruin my finished projects. I loved the thought and look of heat embossing but something was just a bit off. Well, never fear!! I've got your back. This tutorial should help make your heat embossed projects come out perfectly.
1. Supplies needed to make your heat embossing work best include:
- Darice stamp mat (mine is cut in half) - don't stamp anything without this!!
- Embossing buddy (or drier sheet)
- VersaMark (or any watermark stamp pad) and VersaMarker (to correct an oops moments)
- Get Inky! Stamps (of course) and a clear block
- Embossing Powder
- Heat Gun
- Cardstock
- NOT SHOWN - Embossing/glitter tray (shoe box top or a folded piece of copier paper to catch and return the embossing powder to its container)
2. Before doing anything, run the embossing buddy over the cardstock several times. That will coat it with powder disallowing the embossing powder to stick anywhere but where you want it to.
3. Ink the stamp and stamp the impression with the cardstock on top of the stamp mat. You will not be able to see the impression much since it's a watermark ink. Place the cardstock in the embossing tray and dump embossing powder on the stamped area. Some embossing powder will stick to the stamped area. Return the embossing powder that falls off back to its container and close the container.
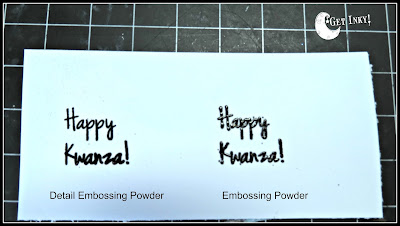
Here you can see an example of the Happy Kwanzaa stamp from the Get Inky! Stamps - 2013 Holiday Set (available at Etsy by clicking the link). It is a small skinny font. On the left is the detailed embossing powder. As you can see, you can barely see that it has embossing powder on it. it almost looks stamped because the grains are so fine. The normal embossing powder is a little more chunky and fuzzy. Furthermore, you can see areas where the powder has not stuck to stamped image.
4. Next step is to use a heat gun to heat the embossing powder until it melts. If it looks grainy then you need to heat it more. If the paper gets brown and burnt, you've heated too long. The color will change before your eyes. It will turn from a powder to a liquid and takes a matter of seconds. You may want to use tweezers to keep my cardstock from moving around on the table. But make sure your cardstock is flat on the table during the heating process.
Here's the results! The detailed embossing powder created an even, shiny, beautifully embossed sentiment even though the font is small and skinny. The regular embossing powder created more of a spotty, messy embossing of the font. It's more shiny and more puddled.
Detailed embossing powder is made to pick up details in the stamps without puddling. Regular embossing powder is made to puddle and melt together to fill in the spaces. That's why it doesn't stick to every part of the stamped image. While detailed embossing powder works well on BOTH detailed stamps and non-detailed stamps, regular embossing powder is ONLY for larger non-detailed stamps.
Here's two other views that exemplify the difference between the two embossing powders. Looks like I need to heat the middle "Ho" on the bottom some more. It's not fully melted! I love the fine lines in this stamp. It will really make wonderful Christmas crafts!
Finally, I have 2 other examples to point out using stamps from the massive Buzzing Bees set. The beautiful script comes out best with detailed embossing powder. When you compare all the loops and holes in the font they are open with the detailed embossing powder and closed with the regular. While it still can be read, it's not as neat, clean and true to form as with the detailed embossing powder.
There are may bees in this set so I chose a very hairy one to show you the difference. This one is harder to see but the hairs are thinner and more individual with the detailed embossing powder than with the regular. The eyes look clearer with the white dot being more visible as well. On the wing of the detailed embossing powdered bee, I didn't apply enough pressure so I used the VersaMarker to go in and add more watermark ink in the spot I missed. I was then able to reapply the embossing powder and heat everything together.
I suggest using detailed embossing powder for all your embossing needs. I use Ranger super fine detail and Stampendous detail embossing powders. Also check out Ranger Embossing Powder Sticky to adhere glitter, foil, flocking. I hope this helps skyrocket your creativity!!
If you have any questions, please leave it in the comments and I will do my best to answer them. If you'd like a new tutorial on the Ranger Embossing Powder Sticky, leave that in the comments as well!
Until next time... now go Get Inky!!
La-Vie


Wow La-Vie - great explanation. I love to emboss, but always wondered why I got mixed results...now I know!
ReplyDeleteThanks so much Lyne! I'd love to see your results with the new knowledge applied! FYI - I have only found the detailed embossing powders at craft shows and online.
DeleteLa-Vie
Great tutorial. I know which embossing powders I need to add to my shopping list.
ReplyDelete~Beth
Thanks so much Beth! FYI - I have only found the detailed embossing powders at craft shows and online. Throw a VersaMarker on the list too. It helps if you make an oops you can fill in spots with it an re-add the powder to just that spot. Those are available at the big stores.
DeleteLa-Vie
This comment has been removed by the author.
ReplyDeleteThank u! I don't have an detailed embossing powder. On a recent card, my son told me the only thing that he didn't like was the sentiment I embossed because it wasn't clear. I was using the wrong powder to emboss with!
ReplyDeleteThanks so much Angelica! I'd love to see your results with this new knowledge. FYI - I have only found the detailed embossing powders at craft shows and online. Throw a VersaMarker on the list too. It helps if you make an little oops you can fill in spots with it an re-add the powder to just that spot. Those are available at the big stores.
DeleteLa-Vie
Can you please share this post so that others can learn as well? Thanks.
DeleteLa-Vie
great info! I use both but it there was a learning curve for me to discover this info, I hope someone NOW "gets" this without all the mistakes we made!
ReplyDeleteThanks so much! That's exactly why I posted this tutorial. Do you use the VersaMarker? It helps if you make an little oops you can fill in spots with it an re-add the powder to just that spot. Those are available at the big stores.
DeleteLa-Vie
Can you please share this post so that others can learn as well? Thanks.
DeleteLa-Vie
I can't believe after all these years I have overlooked this! Thank you La Vie.
ReplyDeleteYou're welcome Ann! I'd love to see your results with this new knowledge. FYI - I have only found the detailed embossing powders at craft shows and online. Throw a VersaMarker on the list too. It helps if you make an little oops you can fill in spots with it an re-add the powder to just that spot. Those are available at the big stores.
DeleteLa-Vie
As a some what beginner I have done pretty good with embossing. But tutorials are always a welcoming helper to all of us. I would like any tutorials you can come up with. Thanks for sharing La-Vie. You can really see the difference between the two techniques... Thanks for sharing :)
ReplyDeleteBlessings,
Kathy Carter
carterscraftingcorner.blogspot
https://www.facebook.com/CartersCraftingCorner?ref=hl
Thanks so much Kathy! I'd love to see your results with this new knowledge. FYI - I have only found the detailed embossing powders at craft shows and online. Throw a VersaMarker on the list too. It helps if you make an little oops you can fill in spots with it an re-add the powder to just that spot. Those are available at the big stores. Our DT team will be posting tips every Tuesday so stay tuned!
DeleteLa-Vie
Can you please share this post so that others can learn as well? Thanks.
DeleteLa-Vie
La-Vie, this is a brilliant tutorial! Love all your examples!
ReplyDeleteThanks Julie. I was trying to make sure it was clear. I wasn't sure if anyone would be able to see the difference but me! LOL! FYI - I have only found the detailed embossing powders at craft shows and online. Throw a VersaMarker on the list too. It helps if you make an little oops you can fill in spots with it an re-add the powder to just that spot. Those are available at the big stores.
DeleteLa-Vie
Well! I did not know all this stuff! WOW--who knew?? Obviously I didn't! ;) Now I know why my embossing powder looks...'weird'..sometimes! Thanks for the knowledge!
ReplyDeleteHi Laura! That's exactly why I did this tutorial!! Glad it helped you. I'd love to see your results with this new knowledge. FYI - I have only found the detailed embossing powders at craft shows and online. Throw a VersaMarker on the list too. It helps if you make an little oops you can fill in spots with it an re-add the powder to just that spot. Those are available at the big stores.
DeleteCan you please share this post so that others can learn as well? Thanks.
La-Vie
Thank you for sharing! I didn't realize there were multiple types of embossing powders!! You have enlightened me!!
ReplyDeleteAwesome tutorial LaVie! I have always had problems with the powder getting everywhere. And I did the same thing you did and bought a 15 bottle box of powders too and I hate them! I don't know if any of my embossing Powders are detailed. I had no idea there was more than one kind.
ReplyDeleteThanks! I have a project for Just-A-Scrappin' this week to do stamps and embossing. this is just what I need to do my best job ever.
ReplyDelete